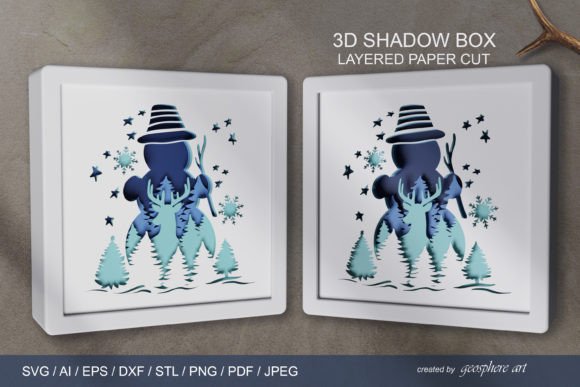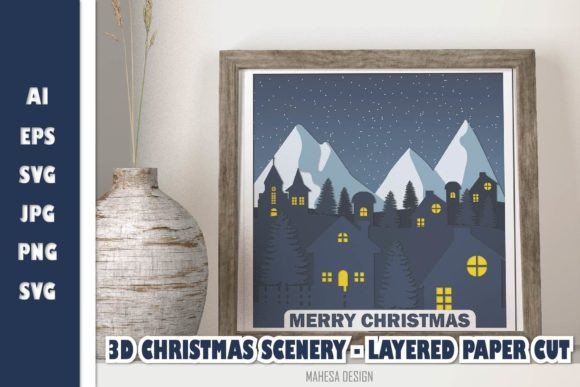
3D Christmas Scenery - Layered Paper Cut: A Creative and Practical Holiday Craft
The holiday season is a time for creativity, tradition, and thoughtful decoration. One standout craft that combines artistry with functionality is the 3D Christmas Scenery - Layered Paper Cut. This design technique involves layering intricately cut paper pieces to create depth and dimension, forming festive scenes like snow-covered villages, animated characters, or winter landscapes. When used in a shadow box format, these layered paper cuts become stunning 3D decorations that can elevate any home’s holiday spirit or serve as meaningful handmade gifts.
What Is 3D Christmas Scenery - Layered Paper Cut?
3D Christmas Scenery - Layered Paper Cut is a form of papercraft that uses multiple layers of cut-out paper elements arranged in a way that creates an illusion of depth when viewed from the front. These designs are often inspired by traditional paper cutting but enhanced with modern tools and techniques to allow for precision and complexity.
The process typically begins with digital design files—such as AI, EPS, SVG, DXF, JPG, and PNG formats—which are then printed onto cardstock or other suitable materials. Each layer is carefully cut using a laser cutter, Cricut machine, or by hand with an X-Acto knife. Once all parts are ready, they’re assembled into a shadow box, giving the scene a three-dimensional appearance that stands out against flat wall decor or centerpieces.
Where Does It Fit Into the Broader Creative Process?
This project isn’t just about making something pretty; it fits naturally into a broader creative workflow. For hobbyists, educators, or small business owners, the 3D Christmas Scenery - Layered Paper Cut serves as a valuable tool in crafting experiences, whether it's personal satisfaction from completing a DIY project or engaging customers with unique holiday products.
For instance, a small business owner selling handmade decorations might use this design to create limited-edition items. They could start by sourcing high-quality digital templates (like those included in the 3D Christmas Shadow Box Scenery - Layered Paper Cuts Download File), print them on durable cardstock, cut the layers, and assemble each piece individually before packaging and shipping. This entire process—from planning to execution—can be streamlined with the right tools and mindset.
Before the Project: Preparation and Planning
Before diving into the creation of your 3D Christmas Scenery - Layered Paper Cut, take some time to prepare. Start by choosing the right materials. High-quality cardstock ensures durability and crisp lines, while thinner stock may be preferable if you're aiming for more delicate details.
You’ll also need to decide on your tools. If you have access to a laser cutter or a Cricut, you can automate much of the cutting process. Otherwise, investing in a good pair of scissors and a precise cutting mat will help if you're doing it manually. Don’t forget to organize your workspace—having a clean area makes handling multiple layers easier and reduces the risk of mixing up parts.
Downloadable digital files, such as the ones provided in the 3D Christmas Shadow Box Scenery - Layered Paper Cuts Download File, offer a structured starting point. These files include everything from vector outlines (AI, EPS, SVG) to raster images (JPG, PNG), which can be useful for visualizing the final product before printing and cutting.
During the Creation: Workflow and Execution
Once you’ve selected your design and prepared your materials, it's time to bring the project to life. Begin by printing each layer on separate sheets of cardstock. Use a color printer if you want to maintain vibrancy, especially if the design includes intricate patterns or festive colors.
Next, cut out each layer carefully. If you're using a laser cutter or Cricut, make sure the software settings match the material thickness to avoid burning or incomplete cuts. For hand-cutting, consider numbering each piece so you don’t lose track during assembly.
After cutting, arrange the layers in order of depth. The backmost layer should be the largest and least detailed, while the front layers contain smaller, more intricate elements. Use foam adhesive dots or mounting tape to space each layer correctly within the shadow box frame. This spacing is crucial for achieving the 3D effect and ensuring that no part of the design is hidden behind another.
Consider lighting as part of your setup. Some creators add LED lights beneath the shadow box or between layers to highlight specific features, especially for display purposes. This not only enhances the visual appeal but also adds a magical touch to any room during the holidays.
After Assembly: Display and Gift Ideas
With the layers assembled, your 3D Christmas Scenery - Layered Paper Cut is ready to be displayed or gifted. Shadow boxes can be hung on walls, placed on mantles, or even turned into personalized gift boxes. If you're giving one as a present, consider customizing the background with names, dates, or special messages to make it more personal.
For businesses or educators, these decorations can be used in a variety of ways. Retailers might sell them as part of a seasonal collection, while teachers could incorporate them into classroom activities that teach design principles, symmetry, or cultural traditions around the world. Freelancers and bloggers can feature them in lifestyle content, tutorials, or product reviews, adding value through hands-on demonstrations.
Integration with Other Tools and Resources
The beauty of using digital files like those found in the 3D Christmas Shadow Box Scenery - Layered Paper Cuts Download File lies in their compatibility with various tools. Vector-based files (AI, EPS, SVG, DXF) work well with most design software and cutting machines, allowing for customization before production. Raster images (JPG, PNG) are ideal for previewing the layout or sharing online as part of marketing efforts.
If you plan to modify the design, Adobe Illustrator or Inkscape are excellent choices for editing vector graphics. You can change colors, scale the design, or adjust the number of layers based on your needs. Additionally, pairing these paper cutouts with other holiday assets—like wood frames, glass panels, or fabric backgrounds—can give your project a cohesive look that aligns with your brand or aesthetic preferences.
Collaboration is also possible. Designers who work remotely can send these files to local makers or manufacturers for production, enabling scalable output without compromising quality. This makes the 3D Christmas Scenery - Layered Paper Cut an efficient solution for entrepreneurs looking to expand their product offerings quickly.
Practical Tips for Implementation
- Organize your layers: Print labels or numbers on each sheet before cutting to ensure proper placement during assembly.
- Use consistent materials: Stick to one type of cardstock for uniformity unless you’re intentionally varying textures for a specific effect.
- Test with a sample: Before committing to a full set, test one or two layers to see how the design looks and feels once assembled.
- Store extra layers properly: If you’re making multiple versions, store unused components in labeled envelopes to keep them safe and easy to access later.
- Optimize for different audiences: Tailor the design complexity and message to suit the age group or interests of the intended recipient.
Workflow Example for Small Businesses
- Acquire the 3D Christmas Shadow Box Scenery - Layered Paper Cuts Download File.
- Edit the design in vector software to include branding elements or personalize for clients.
- Print the layers on heavy-duty cardstock for durability.
- Cut using a laser cutter or Cricut for efficiency and accuracy.
- Assemble each shadow box and add optional LED lighting for added charm.
- Package and ship as a premium holiday product or offer in-store pickups.
Factors to Consider for Long-Term Use
When working with 3D Christmas Scenery - Layered Paper Cut, think about its long-term usability. These decorations can be reused year after year if stored properly. To preserve them, disassemble the layers after the holiday season and place them in acid-free folders or archival boxes. Avoid exposure to direct sunlight or moisture, which can fade colors and warp materials over time.
Additionally, consider the scalability of your project. If you're producing these for resale, evaluate the cost of materials and labor to determine pricing and profit margins. Using downloadable digital files helps reduce overhead costs since you’re not relying on pre-made kits or bulk supplies.
Quality control is essential, especially if you're creating multiple copies. Establish a checklist for each step of the process, from printing and cutting to assembling and packaging. This ensures every piece meets the same high standard and maintains the professional look your audience expects.
Why Choose 3D Christmas Scenery - Layered Paper Cut?
Compared to traditional flat paper crafts, 3D Christmas Scenery - Layered Paper Cut offers a richer sensory experience. The added depth allows viewers to explore the design from different angles, revealing new details as they move closer or farther away. This makes it particularly effective for interactive displays or educational projects where engagement is key.
Moreover, the process of creating these scenes can be therapeutic and rewarding. Many hobbyists enjoy the challenge of arranging layers and seeing a static image come to life in 3D. For marketers and influencers, showcasing the transformation from a digital file to a finished product can inspire others to try similar projects.
Conclusion
Incorporating 3D Christmas Scenery - Layered Paper Cut into your creative routine or business model can yield impressive results. Whether you're a professional designer, an educator planning a class activity, or someone simply looking for a meaningful holiday project, these layered paper cutouts provide both artistic freedom and practical application. With the right preparation, tools, and attention to detail, you can create lasting decorations that reflect your style and craftsmanship.
Remember, the 3D Christmas Shadow Box Scenery - Layered Paper Cuts Download File gives you the flexibility to experiment and adapt. As you refine your workflow, you'll find new ways to integrate this craft into your existing processes, opening up opportunities for innovation and connection during the holiday season.