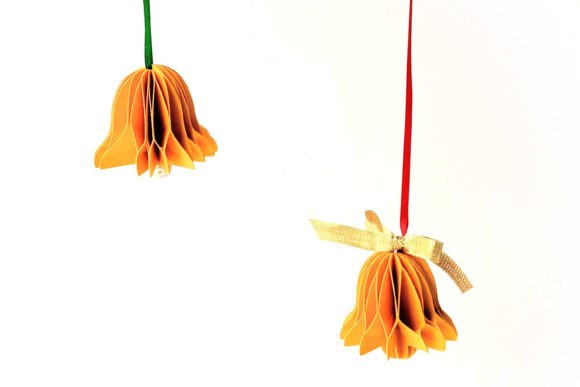
Gumdrop Ornament 3D Papercraft: A Sweet Holiday Craft Idea
Bring a touch of whimsy and charm to your holiday decorations with the Gumdrop Ornament 3D Papercraft. Inspired by the classic confection, this papercraft design transforms the beloved candy into an elegant and festive ornament. Perfect for adding a playful yet sophisticated flair to your Christmas tree or seasonal displays, it’s an ideal project for those who enjoy hands-on creativity and meaningful DIYs.
What Makes This Papercraft Design Unique?
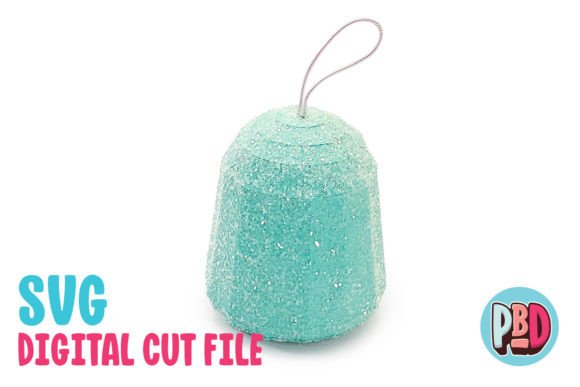
The Gumdrop Ornament 3D Papercraft stands out due to its clever balance of simplicity and visual appeal. Designed to mimic the shape and texture of a real gumdrop, it features smooth curves and a three-dimensional form that brings depth to any flat sheet of cardstock. What makes it even more special is the option to add glitter texturing—giving each piece a sparkling finish that catches the light just like candy under a store display.
Built using sturdy 65 lb. cardstock or heavier, the ornament ensures durability while maintaining the delicate look of paper craft. The downloadable package includes SVG and DXF cut files, along with detailed PDF instructions, making it accessible for both digital cutting enthusiasts and traditional hand-crafters. These files are compatible with Silhouette Designer Edition and Cricut Design Space, although users should follow specific steps when opening DXF files in Silhouette Studio to ensure proper alignment.
Creative Possibilities and Project Ideas
This versatile design opens up a world of creative opportunities. Here are some ways you can use the Gumdrop Ornament 3D Papercraft to elevate your holiday projects:
- Themed Decorations: Incorporate the gumdrop into a Candy Land-inspired theme for your home or office. Pair it with other sugar-themed paper crafts like peppermint sticks, candy canes, and gingerbread houses for a cohesive look.
- Gift Packaging Accents: Use multiple gumdrops as decorative elements on gift boxes. They can be strung together or placed individually to create a sweet and festive presentation.
- Wedding or Event Favors: For holiday weddings or winter-themed events, these ornaments can serve as charming favors. Attach them to small bags of actual gummy candies for a delightful surprise.
- Classroom Activities: Educators can use this project as part of a holiday arts and crafts lesson. It encourages students to work with precision and introduces basic concepts of 3D design.
- Social Media Content: Bloggers and content creators can showcase the step-by-step process of assembling the ornament, offering viewers a fun and achievable DIY idea for their own holiday cheer.
Customization Tips for Personal Style
While the original design is already adorable, there's room for personal expression. Consider these customization ideas:
- Vary the Color Palette: Choose traditional red and green hues for a classic feel, or go bold with pastels, metallics, or even monochrome tones for a modern twist.
- Add Textures and Patterns: Beyond glitter, try embossing or patterned papers to give the gumdrop a tactile dimension. Think polka dots, stripes, or even edible-print designs if you're feeling adventurous.
- Experiment with Size: While the standard size is 3 W x 3 D x 4 H, you can scale the design up or down depending on your needs. Larger versions make great wall art, while smaller ones fit perfectly on gift tags or cards.
- Incorporate Real Gumdrops: Glue an actual gumdrop inside the papercraft shell for a unique blend of decoration and nostalgia. Just be sure to seal it properly if it will come into contact with moisture.
Adapting the Design for Different Audiences and Goals
Whether you’re crafting for yourself, your family, or your business, the Gumdrop Ornament 3D Papercraft can be tailored to suit various purposes and audiences:
For Entrepreneurs and Small Businesses
If you're in the retail or event planning industry, consider producing batches of these ornaments for sale. They can be sold as standalone items or bundled with other holiday-themed paper goods. With the included SVG and DXF files, you can easily mass-produce them using a digital cutter, ensuring consistency across your inventory. Adding a custom label or logo to the back gives your product a professional edge.
For Educators and Group ProjectsFor Educators and Group Projects
In a classroom setting, the Gumdrop Ornament 3D Papercraft offers a fantastic opportunity to teach kids about shapes, spatial awareness, and fine motor skills. Teachers can break the assembly into manageable steps and encourage teamwork during construction. Plus, the glitter texturing element adds a sensory component, making it engaging for all learning styles. Don’t forget to let students personalize their creations—this can spark conversations about colors, textures, and even candy preferences!
For Bloggers and Content Creators
Bloggers looking to inspire their audience can feature the Gumdrop Ornament 3D Papercraft as part of a holiday crafting series. Include time-lapse videos of the cutting and assembly process, highlight different variations, and share behind-the-scenes tips on how to achieve the best results with your software settings. You might also offer printable templates or alternate color schemes for followers who prefer hand-cutting over digital tools.
Practical Guidance for Clear Results
To get the most out of your Gumdrop Ornament 3D Papercraft experience, keep these tips in mind:
- Use the Right Materials: Stick to 65 lb. cardstock or heavier for sturdiness. Lighter paper may tear during folding or handling.
- Organize Your Files: After downloading the ZIP file, extract all contents before importing into your cutting software. Make sure you understand which format (SVG or DXF) works best for your machine.
- Set Preferences Correctly: When using DXF files in Silhouette Studio, adjust the import settings to “Centered” rather than “As-is.” This ensures the pieces are aligned properly and reduces post-cutting adjustments.
- Follow Instructions Step-by-Step: The provided PDF instructions are designed to guide you through each stage clearly. Take your time and avoid skipping steps, especially when scoring or folding for clean lines.
- Test Before Mass Production: If you plan to make several ornaments, do a test run first. This helps you identify potential issues with alignment, scoring, or adhesion before committing to larger quantities.
Glitter Texturing: Making It Sparkle Without Mess
One standout feature of this design is the optional glitter texturing. To apply it effectively:
- Choose a high-quality adhesive that dries clear and bonds well to cardstock.
- Apply a thin layer of glue only where you want the glitter to stick. Too much glue can warp the paper or cause clumping.
- Press the glitter gently into the wet adhesive, then shake off the excess. For better coverage, you can repeat the process with a second coat.
- Let the ornament dry completely before hanging. This prevents smudging and ensures a long-lasting finish.
Consider using colored glitters or combinations for a multidimensional effect. Matte finishes can also be used for contrast against glossy parts of the ornament.
How to Showcase and Share Your Work
Once your Gumdrop Ornament is complete, think about how you can share or display it. Here are a few suggestions:
- Hang It Up: Simply thread a ribbon or string through the pre-made hole and hang it on your tree. Its compact size allows it to sit nicely among other ornaments without overwhelming the branches.
- Frame It: Use a shadow box frame to preserve your creation as a keepsake or holiday artwork. Add a small plaque or label for a personalized touch.
- Share Online: Post photos of your finished ornament on social media platforms like Pinterest, Instagram, or TikTok. Tagging the design or using hashtags such as #PaperCraftChristmas or #DIYOrnaments can help reach others interested in similar projects.
- Host a Workshop: Invite friends, family, or community members to join you in making these ornaments. Provide materials and walk them through the process, turning it into a memorable holiday gathering.
Design Consistency and Quality Control
If you're making multiple ornaments—whether for personal use or resale—keeping things consistent is key. Use the same type of cardstock and adhesive, and maintain a uniform approach to texturing and finishing. This not only looks more professional but also makes the ornaments easier to assemble in bulk.
Also, take note of any common mistakes from your first attempts. Did the folds resist? Was the glitter too thick? Adjust your technique accordingly and document your findings. Sharing your insights can turn your experience into valuable content for others trying the same project.
Final Thoughts on Creative Expression
The Gumdrop Ornament 3D Papercraft is more than just a festive decoration—it’s a canvas for your creativity. Whether you're aiming for a nostalgic Candy Land aesthetic or exploring new design possibilities, this project allows you to express your style while staying grounded in practicality. It’s perfect for those who love to blend tradition with innovation, and it fits seamlessly into a wide range of creative contexts.
By adapting the design to your goals and sharing your journey with others, you can turn a simple paper craft into something truly meaningful. So grab your materials, follow the instructions, and let your imagination run wild with this delightful ornament.