Wet Woodland 3D Shadow Box Paper Cut: A Layered Craft for Creative and Practical Purposes
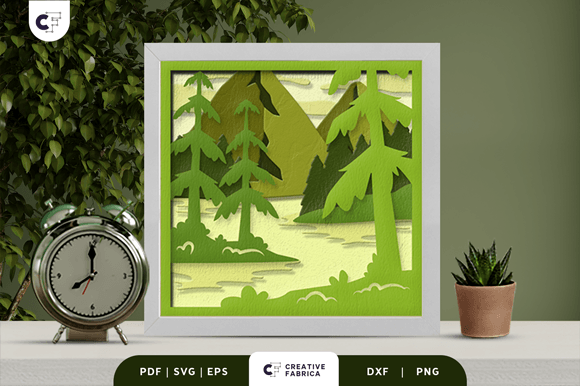
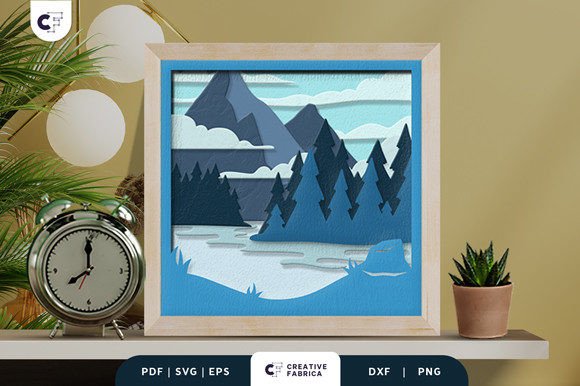
The Wet Woodland 3D Shadow Box Paper Cut is a detailed, layered paper-cutting template designed to bring the beauty of nature into your home or creative projects. This intricate design captures the essence of a wet woodland scene, making it ideal for those who enjoy crafting with precision and artistry. Whether you're an experienced crafter or just beginning to explore the world of paper cutting, this template offers a versatile and visually striking option that can be adapted to suit various purposes.
What Is the Wet Woodland 3D Shadow Box Paper Cut?
The Wet Woodland 3D Shadow Box Paper Cut is a square, multi-layered paper cutout that features a realistic depiction of a forested area with water elements. With ten layers in total, the design creates depth and dimension when assembled, mimicking a shadow box effect. Each layer is crafted to interlock seamlessly, allowing for easy assembly while maintaining the structural integrity of the final piece.
This product comes in multiple file formats including SVG, PDF, EPS, PNG, and DXF, ensuring compatibility with a wide range of tools—from digital cutting machines like Silhouette and Cricut to traditional hand-cutting methods using an art knife and scissors. The size of the template is precisely 20.32×20.32 cm, which provides enough detail without being overly cumbersome to handle. Importantly, the SVG files can be resized while preserving the aspect ratio, offering flexibility depending on the project’s needs.
Integrating It Into Your Crafting Workflow
Incorporating the Wet Woodland 3D Shadow Box Paper Cut into your crafting workflow requires careful planning and execution. Start by assessing the tools you have available. If you own a Silhouette or Cricut machine, the SVG file makes the process straightforward. Simply load the design into your software, adjust the settings according to your cardstock type, and let the machine do most of the cutting work. However, if you prefer a more hands-on approach, the design can also be cut manually using an art knife and a self-healing mat.
Once all the layers are cut, the next step involves assembling them. You’ll need glue or double-sided tape to hold the pieces together. For best results, consider starting from the backmost layer and working forward, aligning each piece carefully to maintain the visual hierarchy and spatial balance of the design. This method ensures that smaller details at the front remain visible and properly positioned.
Use Cases and Creative Applications
The Wet Woodland 3D Shadow Box Paper Cut is not limited to one use—it serves as both a decorative and functional craft item. One popular application is as a framed wall decoration. Once assembled, the piece can be mounted in a standard picture frame, adding a touch of elegance and natural charm to any room. Alternatively, you can enhance its visual appeal by turning it into a light box. Simply place LED strips between the layers before mounting them inside a transparent or semi-transparent box. The result is a glowing, ambient piece of decor that casts beautiful shadows and highlights the intricacies of the design.
Another practical use is as a gift. When finished, the design can be placed in a custom-made wooden box, wrapped in tissue paper, and given as a thoughtful present for birthdays, holidays, or special occasions. Its universal appeal makes it suitable for friends, family members, or anyone who appreciates handmade, artistic gifts.
Before Starting: Preparation and Materials
Before you begin, ensure you have all the necessary materials on hand. These typically include:
- Precise cutting tools (digital or manual)
- Cardstock—preferably Encore Cardstock 80 lb cover (216 gsm), known for its durability and smooth surface
- Glue or double-sided tape for layer assembly
- A backing board or frame for display
- Optional: LED strips for lighting effects
It's important to note that the colors you see in the preview may vary slightly due to differences in lighting and the actual paper color. To maintain consistency, especially if you plan to produce multiple copies or sell the finished products, always test with the same brand and weight of cardstock.
During the Process: Execution and Assembly
When executing the design, attention to detail is key. If using a digital cutter, ensure the machine is properly calibrated and the cardstock is securely loaded. If cutting by hand, take time to trace the lines clearly and cut slowly to avoid mistakes. After all layers are prepared, lay them out in order before gluing to check alignment and spacing.
During assembly, use small dabs of glue or double-sided tape to secure each layer. Avoid applying too much adhesive, as it can warp the cardstock or make adjustments difficult. For a professional finish, consider using a bone folder to press the layers firmly into place. Once assembled, allow the piece to dry completely before handling or displaying it.
After Completion: Display and Maintenance
After completing the Wet Woodland 3D Shadow Box Paper Cut, the focus shifts to how you want to showcase it. As mentioned earlier, framing is a common choice. Choose a frame that complements the natural theme of the design—wooden frames with a matte finish often work well. If you opt for a light box version, ensure the LED strips are evenly spaced and powered correctly for optimal illumination.
For long-term maintenance, keep the finished piece away from direct sunlight and high humidity to prevent fading or warping. If displayed in a light box, periodically check the LED connections to ensure they continue to function smoothly. Cleaning can be done with a soft cloth or brush to remove dust without damaging the delicate paper layers.
Interacting with Other Tools and Resources
The Wet Woodland 3D Shadow Box Paper Cut works well alongside other resources and tools commonly used in paper crafting. For instance, it pairs nicely with cardstock from the 12×12 Cardstock Shop, where you can find the exact type of material recommended for this project. Additionally, using a ruler and T-square can help in aligning the layers accurately during assembly.
If you're incorporating this design into a larger project—such as a holiday greeting card or a custom wooden box—consider how the scale and style of the paper cut will integrate with other components. You might also pair it with complementary elements like pressed flowers, acrylic paints, or gold leaf accents to add texture and contrast.
Workflow Examples for Different Users
Here are a few workflow examples tailored to different types of users:
- Hobbyist: Begin by downloading the SVG file and loading it onto your cutting machine. Use thick cardstock to give the finished piece a sturdy feel. Assemble the layers carefully and frame the design for a personalized wall hanging.
- Entrepreneur: Incorporate the design into your product line. Create multiple versions using different colored cardstocks to offer variety. Package them as ready-to-assemble kits or fully completed items, depending on your customer base and production capabilities.
- Event Planner: Use the design as part of event décor. Place several light box versions around a venue to create a calming, nature-inspired ambiance. You could also customize the color scheme to match the event’s theme.
Practical Tips for Quality Results
To achieve the best results with the Wet Woodland 3D Shadow Box Paper Cut, follow these tips:
- Always print or cut a practice sheet first to check alignment and proportions.
- Use a consistent cutting depth when using a blade, especially if working with multiple layers.
- Consider laminating the final piece if it will be handled frequently or exposed to environmental factors.
- Label each layer during the cutting phase to streamline the assembly process.
- Experiment with different lighting setups to discover the most appealing shadow effects.
Factors to Consider for Optimal Use
Several factors should be taken into account when working with the Wet Woodland 3D Shadow Box Paper Cut to ensure efficiency and quality:
- Preparation: Organize your workspace and tools before starting to minimize disruptions and errors.
- Compatibility: Confirm that your chosen cutting tool supports the file format you’ve downloaded. Most modern machines accept SVG files, but it's wise to verify.
- Usability: Think about the end purpose of the design. Will it be hung, placed on a desk, or embedded in another product? This helps determine the appropriate materials and finishing techniques.
- Organization: Keep your layers sorted and labeled to avoid confusion during assembly.
- Efficiency: Batch processing similar designs can save time if you’re creating multiple units for a project or sale.
- Consistency: Stick to the same paper type and weight across all copies to maintain uniformity in appearance and durability.
- Quality Control: Inspect each cut layer for accuracy and completeness before moving on to the next step.
- Long-Term Use: Choose durable materials and proper storage options if you intend to display the piece for years to come.
Conclusion: Enhancing Creativity Through Precision
The Wet Woodland 3D Shadow Box Paper Cut is more than just a decorative craft—it's a testament to the power of precision and planning in creative projects. By integrating this design into your workflow thoughtfully, you can elevate your output whether you're making personal gifts, professional products, or simply enjoying the hobby of paper cutting. With the right tools, preparation, and attention to detail, this template becomes a valuable asset in your creative toolkit.